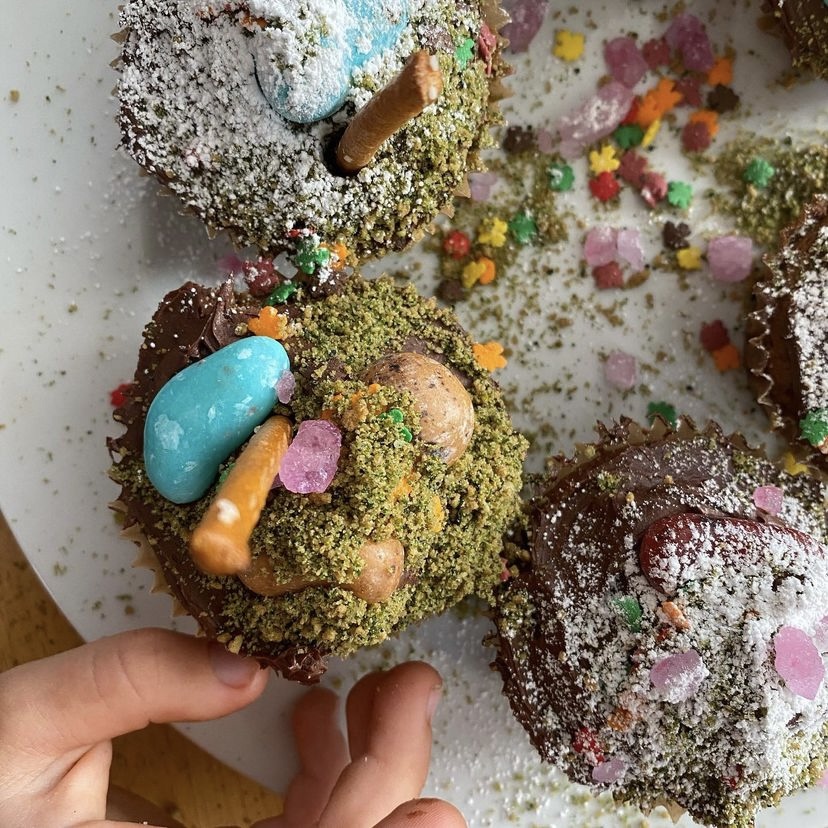
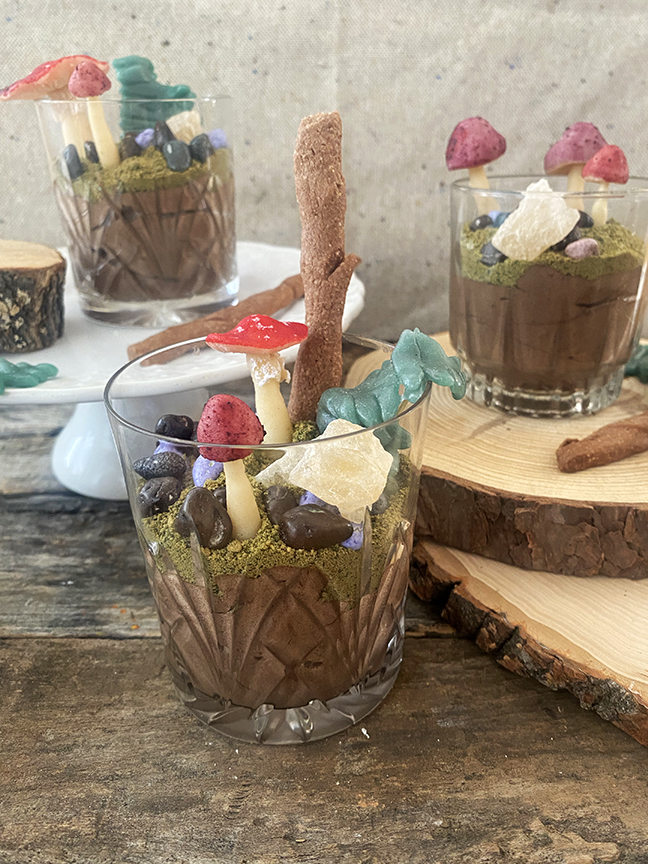
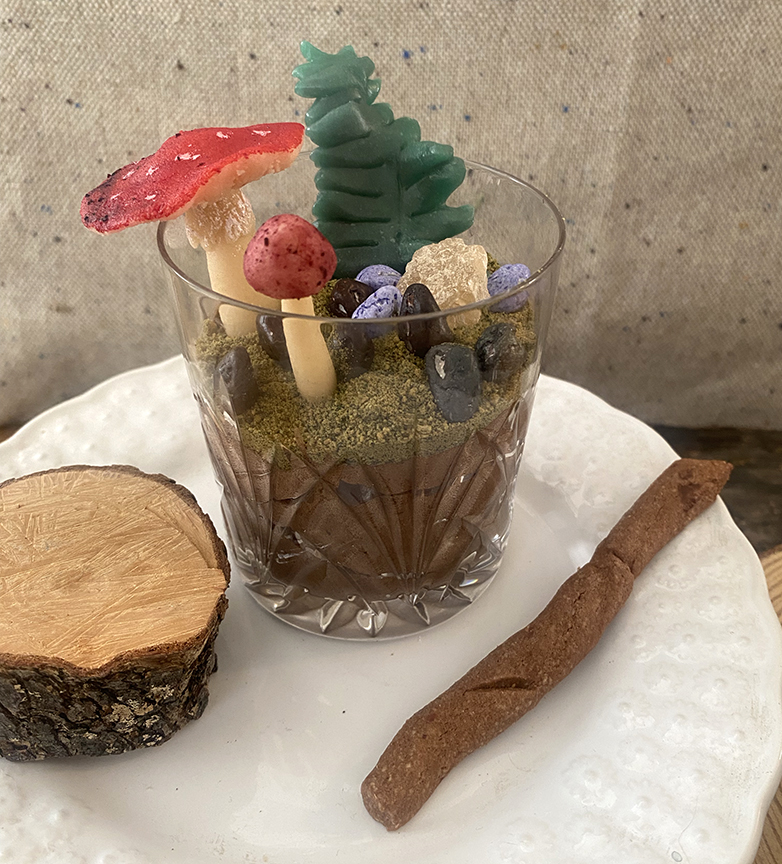
My kids have been obsessed with terrariums lately (more on that later…) so for our magical forest themed craftbrunch I decided to splash out and make little edible woodland terrariums. These are definitely a little fussy to make, but they aren’t especially hard and look way more impressive than they are. (These are a slightly fancier version of the puddings I made for the worm moon here) They are honestly a much fancier version of those dirt puddings that were all the rage for a minute in the 80’s. I realize I’m dating myself, but I guess I never got over those- ha! I have in the past used disposable clear plastic cups, but since we were being fancy, I made these in mismatched crystal. I made the terrariums in this post myself as a surprise, but this is also a great project to do with kids. Just set out all the different components and let them go nuts. My kids have chosen making these as a reward on several occasions!
Building the Terrariums
Base:
You have a bunch of options here. For these terrariums I made a chocolate mousse because I was craving it. It was delicious. I have made these for kids parties with alternating layers of chocolate and butterscotch pudding which is super easy and gives you strata. I have also plunked both homemade and storebought cupcakes into the cups, as well as made these as cupcakes with no cups. Cake should be chocolate (for dirt) and you cab use whatever icing you like because teh moss will cover it anyway!
Moss:
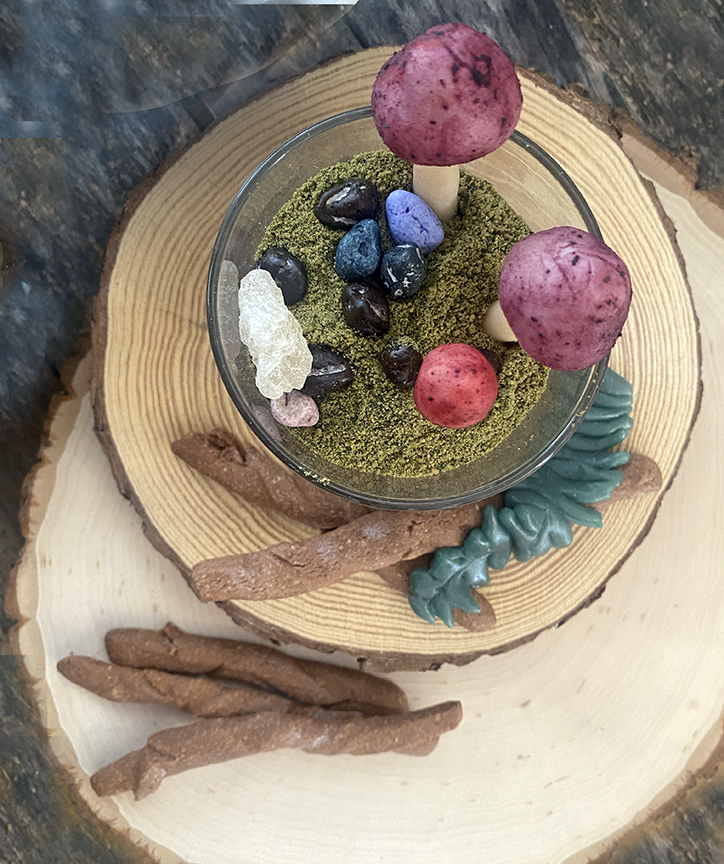
My foolproof method for making edible moss (and this actually comes up surprisingly often in my life… lol) is to blitz graham crackers with some matcha powder and a little green food coloring. You can skip the food color if you prefer, but it won’t get quite as green. Sprinkle the moss crumbs on top of your mousse, pudding, or icing for a perfect base.
Sticks:
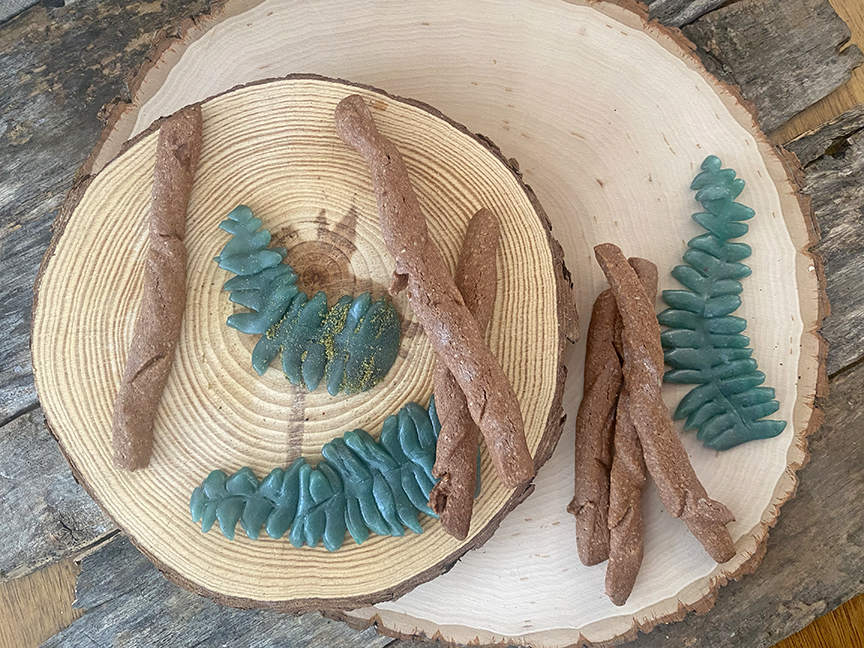
If you are not a celiac you could just use pocky for the sticks, but I am a celiac so initially I was planning to make homemade pocky. However, I loved the flavor of these so much that I didn’t end up dipping them in chocolate. Making them myself also meant I could make them twisty and more branch like and I swear they tasted better that way. (I made half the batch as traditional roll out cookies and they weren’t as good! Sticks taste better!) All I did to make these is add 1/4 cup of cocoa powder to my regular sugar cookie recipe. I didn’t adjust any other ingredients. Who knew? (My recipe is here, leave out the raspberry, chocolate and rose petals and add 1/4 cup of cocoa.) To shape them, roll the dough out to around 1/4″ and cut into 1/4″ strips. Twist and roll the strips to make them look like sticks. I found twisting in particular got rid of teh straight edges. You can nick them with the tip of a knife to make little “buds.” This is great to do with kids and generally very satisfying because the more you mangle them the more organic they look!
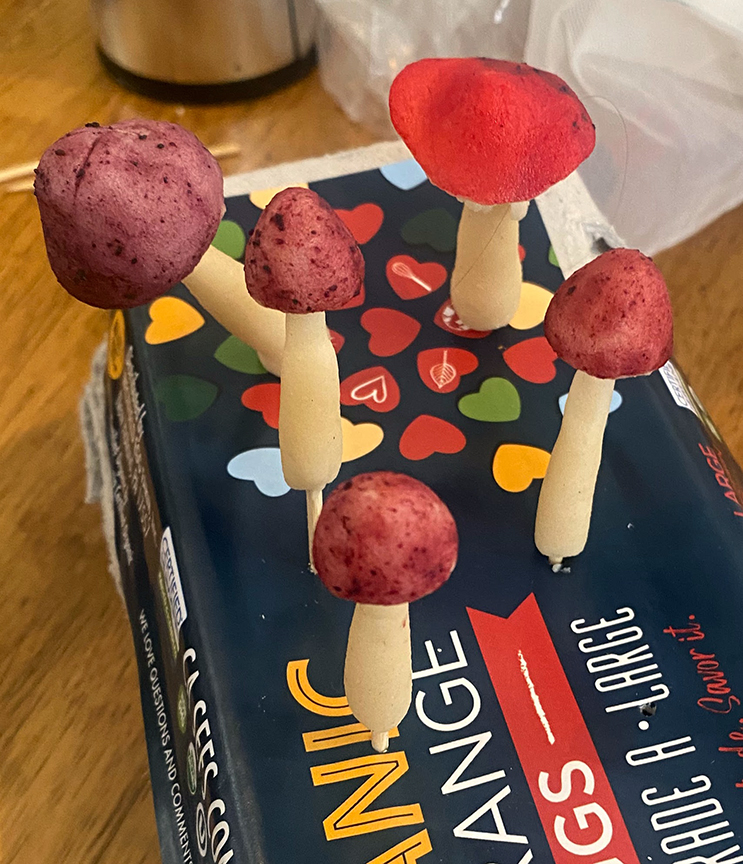
The Mushrooms:
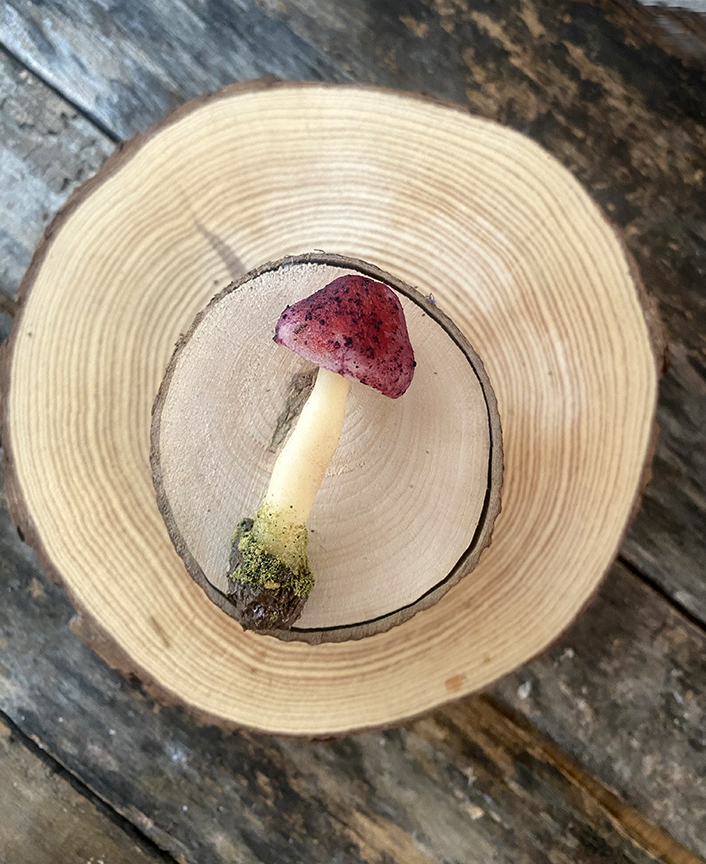
These are made from marzipan. Shape the caps (here are some instructions for making mushroom shapes, it uses clay, but same process) and then shape the stems. Stick a toothpick up the stem and then join it to the cap. ( i don’t always use a toothpick, if you let them dry thoroughly they will stand fine without one, but I was impatient) At this point you can poke holes in an egg carton and leave the mushrooms to dry. After they have dried for a few days paint the caps. I usually do this with food coloring and a brush, but I couldn’t for the life of me find my gel colors so I decided to experiment. I mixed hibiscus powder with water and got a beautiful burgundy that was perfect for mushroom caps. It left little flakes of flower petal too which looked appropriately mushroomy. I did eventually find the red which I used for the fly agarics.
Ferns:
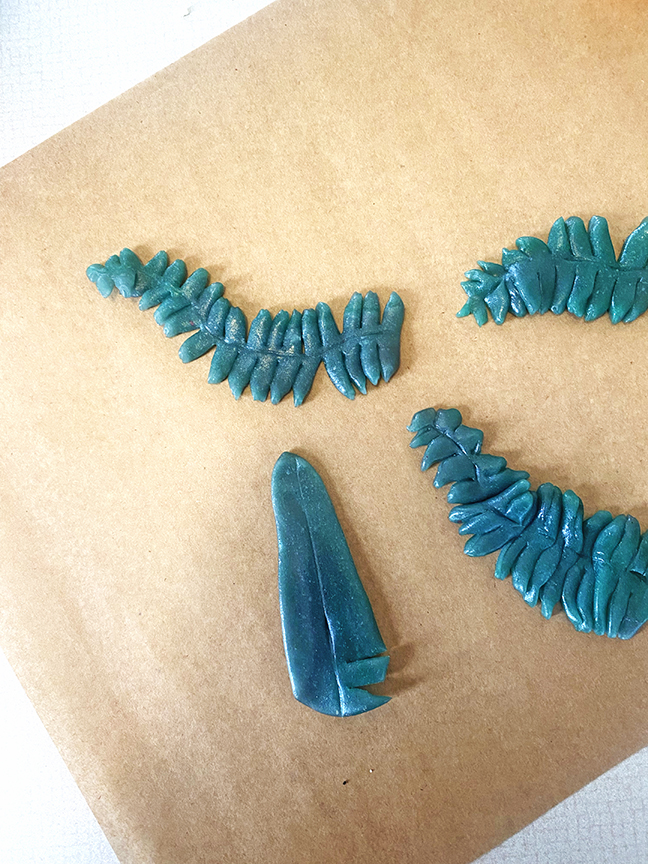
I am super excited about these– this was a last minute hairbrained scheme that worked better than expected. My kids helped too which made for an exciting project. They are made from airheads. My kids recommended laffy taffy but we couldn’t find any and I was happy with the flexibility of the airheads. (I definetly spebt some time squishing different candies through the bag in the store like a weirdo) My kids were extremely excited to be called in as candy suitability experts. When I opened up the green airheads however I was not excited about the extremely bright green color. I tried to mix a white with a green, but it was really stiff and hard to mix. I stuck it in the microwave on a whim (10 year old warned me that it might explode..) and it was perfect, easy to mix and mold. 10 seconds was the perfect amount of time for me, but microwaves are all over the place so test yours before assuming. Also we had one airhead that was inexplicably molten after 10 seconds while the rest were perfect. Anyway, I still didn’t like the color so I kept adding more until it felt right. My special airhead fern recipe ended up being: 3 white, 2 green and 1/2 a red. To shape the ferns, pat them into triangles and the roll to around 1/8″ thick with a rolling pin. (This is easy if they are warm.) use a toothpick to draw a line down the center. Then, use a pair of kitchen shears to snip horizontal cuts along both edges. After you make each cut, pinch the end of the frond to a point. Look at the picture below if that doesn’t make sense. (The first time I did it, I made all the cuts and then tried to pinch the points, but they had all stuck back together so pinch as you make the cuts.) The fern will warp a bit as you work on it, but again it just looks more natural! You can also stick it back togther if you have any accidents.Let them cool back down to firm up.
Rocks & Crystals:
I just buy rock candy for the crystals and candy rocks. If you were feeling ambitious you could potentially make both though!