As a member of the Plant Wonder Collective, each month I make a craft from the plant of the month. This March is coffee. I was really stumped trying to figure out what to make. Coffee and I are not friends. I had to stop drinking coffee cold turkey in my early 20s for medical reasons and I have never quite forgiven coffee for turning on me. And my husband, who drinks lots of coffee, leaves a little pile of gross coffee grounds on the counter every morning that makes me insane. So I decided I was going to do something with coffee grounds if it killed me. First I made some seed paper with coffee grounds, because of coffee’s high nitrogen content it should theoretically give those seeds a head start. But it didn’t look all that interesting.
Then I started thinking about how you can grow some mushrooms on coffee grounds, which I have always meant to do but never quite gotten to. So I decided I would grow some oyster mushrooms, which particularly like to grow on coffee, and I particularly like to eat. But I still wanted to make something visually more interesting than a jar of coffee grounds and mycelium. At the same time my husband had been making a huge brush pile in the yard and mentioned that I should start some mushrooms there. Usually you do that with plugs, but maybe since I had just been making seed paper seed bombs popped into my head. And thus, the spore bomb was born!
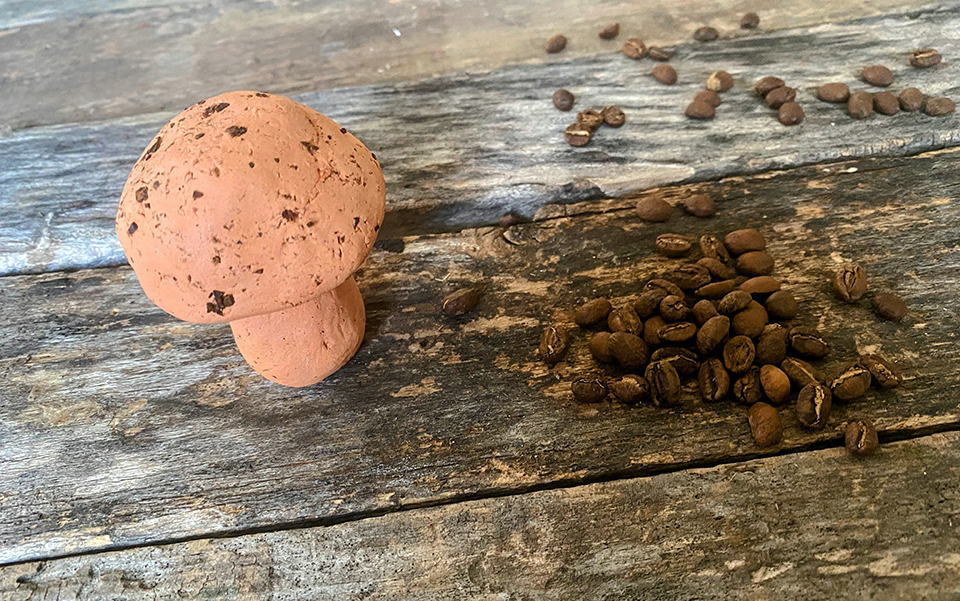
Most controlled mushroom fruiting is done in plastic bags, and I knew I didn’t want to do that. I certainly couldn’t throw into log pile like that. The plastic is really handy for keeping the moisture in though, so I replaced that with clay which should hopefully do something similar. Full disclosure, I am still testing this process and can’t guarantee success quite yet. The idea is that you gorw mycelium in your coffee grounds, then wrap chunks of it in clay to keep them moist, then throw them into log piles and dead wood. I also thought about waxing the whole thing like you do with plugs, that may be phase two. The mushroom shape is not at all functional, just because it’s cute!

Oyster Mushroom Coffee Spore Bombs
I purchased oyster mushroom spawn for this project, you can also use a whole oyster mushroom, or reuse the matrix from one of the little grow kits. I have not tested other mushrooms because oysters particularly do well growing on coffee grounds. This is not a quick project, although it is simple. The mycelium will need at least a week or more to grow and establish in the coffee grounds. Those are the white fibrous threads that are almost like roots. To begin fruiting, which is what we call a mushroom, most species need s temperature shock (which throwing it outside should provide) and even moisture which the clay should provide. Oyster mushrooms like to grow in dead hardwood, so that is what you should look for in terms of places to throw your bombs. You do not want oysters growing in healthy trees because they break down wood.
Materials:
- coffee grounds, less than 24 hours old, cooled
- oyster mushroom spawn (see intro note)
- bowl or jar
- air dry clay (ensure it’s non-toxic)
- dead wood
Method:
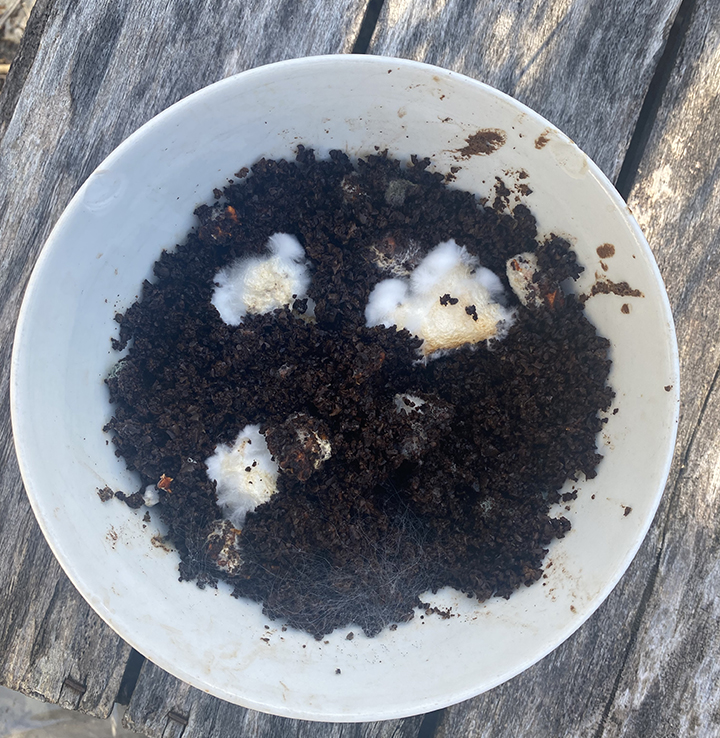
First you will need to let the oyster mushroom spawn grow in the coffee grounds. Place cooled fresh grounds into a clean jar or dish. You want everything to be clean, you don’t want to introduce any unwanted fungi to the party.
Nestle your oyster spawn into the coffee. For the next few days you can keep adding cooled grounds on top. Cover the jar/ bowl with a plate or lid to keep moisture in.
After a few days you should see white threads growing in the coffee. Let them go, ensuring that the coffee is staying damp, until the whole things has mostly turned white. This can take a week or more.
Once you have healthy mycelium, break off some seed bomb sized chunks and long with a little extra coffee, wrap them in clay. To do this, take a hand sized chunk of clay and pat or roll it into a thin circle about an 1/8″ thick. place the coffee/ mycelium mixture in the center and bring the edges up to meet. Pinch and smooth the clay around the center until you are sure it is completely sealed. Roll it in your hands to smooth it out and use your fingers to smear closed any lines of seams. You can leave it as a perfectly functional sphere or you can shape it into a mushroom.
To make your bomb mushroom shaped, flatten one side of the sphere and squish around the top to make a more cone shaped mushroom cap. Then roll another piece of clay into a thick rope for the stem. Stick the stem onto the cap and squish it in place. This will ensure good contact as well as making the base of the stem plumper.
Allow to dry and then throw outside onto some dead hardwood!
[…] Mushroom bombs […]