The October full moon is most often called the Hunter’s Moon in popular moon-name lingo. This name was cited in the Oxford English Dictionary in 1710 and is almost certainly European in origin. It is believed that this full moon came to be called the Hunter’s Moon because October was the time to go hunting to store up food for the cold winter ahead. Still, this name doesn’t resonate with me at all. In contrast, the Falling Leaves Moon is an Anishinaabe term referring to the seasonal changes in much of North America this time of year. The Abenaki call this moon the Leaf Falling Moon, the Arapaho use the Falling Leaves Moon, and the Lakota name is the poetic When the Wind Shakes Off the Leaves Moon. The Cree term is the Migrating Birds Moon, which is also a lovely visual.
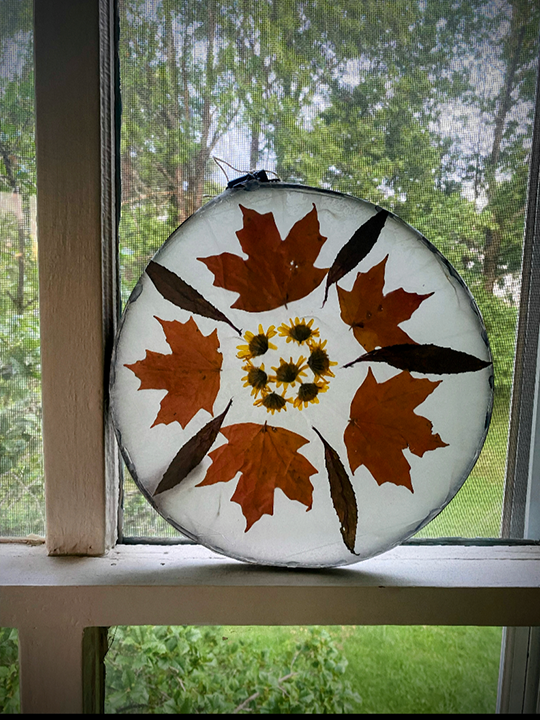
When you close your eyes and think about October, the thing many of us are most likely to see are red and gold leaves. It is one of the defining features of fall even in places further south where is doesn’t really happen the same way. So Falling Leaves Moon feels like a no-brainer to me in terms of phenological observations of many northern areas. Fall is also the time of year I want to start making lanterns- night is falling sooner and is getting longer. Hence the Falling Leaves Lantern was born.
My more southern friends might want to look to some of the southern tribes for inspiration or to observe what is happening in nature around your part of the world. The Choctaw people refer to October’s full moon as the Wildcat Moon, the Creek refer to the Chestnut Moon and the Zuni people speak of the Big Wind Moon.
Falling Leaves Lantern
Wax paper lanterns are super simple to make and have a beautiful frosted glow that I can’t get enough of. I wanted to make this one simple so instead of making a frame out of wire, I used hose clamp that is already the same shape. You could use an embroidery hoop the same way, although the hose clamp is a little thicker.
Materials:
- fall leaves
- dried pressed flowers (optional)
- wax paper
- hose clamp or embroidery hoop in desired size (I used 10″)
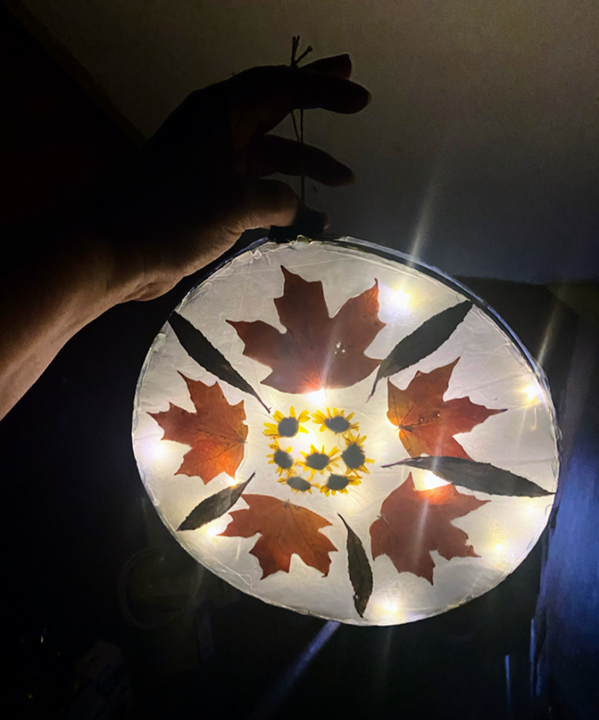
- battery powered fairy lights
- iron
- towel
- parchment paper
- hot glue
- twine or wire for hanging
Method:
First gather your leaves and or flowers and lay them out in an arrangement you like that fits inside your hoop. (You can lightly trace the outline of the hoop onto your wax paper to help you.)
Once you are pleased with your layout, sandwich it between two sheet of wax paper. Lay a towel on your table and place your wax paper on top. Make sure none of your leaves have shifted. Lay a piece of parchment paper on top (or another towel) and iron the wax paper until both pieces have fused together and trapped the leaves inside. Repeat so that you have two pieces of fused wax paper when you are done. Allow to cool.
Lay one of your wax paper pieces face down on a work surface and place your hose clamp/ embroidery hoop on top. Run a line of hot glue around the whole inside of the hoop attaching the wax paper to the hoop. Allow to cool and then trim the paper in a circle to fit the hoop.
Place your fairy lights inside and glue the little switch to the edge of the hoop so that you can reach it once it’s closed up.
Place the second piece of fused wax paper face down and flip the half covered hoop on top so that the lights are inside the circle. This time you will have to glue around the outside of the circle so just try to be as neat as possible. Skip over the little bit where the switch is. Once the glue cools trim it into a circle again.
Use the top clamp to tie on a piece of twine or wire to hang and light up your lantern!

[…] secret that we love lanterns, this site is full of various lantern designs of varying complexity. (falling leaves lantern, star lanterns, harvest moon lanterns, frost lanterns) But when my kids were toddlers this was the […]